模板: RPI-RGB-Matrix-P2.5-64x32 Manual
来自Waveshare Wiki
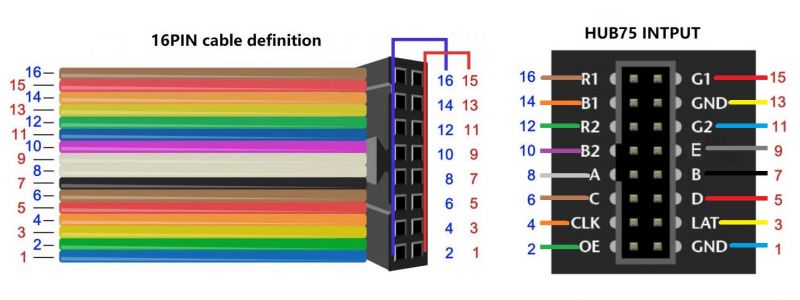
硬件连接
准备材料
- RGB-Matrix-P2.5-64x32(本产品)
- Raspberry Pi(须另购)
硬件连接示意图
树莓派最多可以共享连接三个LED点阵屏面板,如果只有一个面板,只需按下表的😄标注处对应连接引脚,[2]💥和[3]💧是需要同时共享第二个和第三个面板的连接才需要接入。
下表为了视觉上更好的区分,增加了一些图标:[1]=😄, [2]=💥和[3]=💧。
注意:如果只是接入一个面板,只需连接😄图标的引脚即可。
| Connection | Pin | Pin | Connection |
|---|---|---|---|
| - | 1 | 2 | - |
| 💧 [3] G1 | 3 | 4 | - |
| 💧 [3] B1 | 5 | 6 | GND 😄💥💧 |
| 😄💥💧 LAT/STB | 7 | 8 | [3] R1 💧 |
| - | 9 | 10 | E 😄💥💧 |
| 😄💥💧 CLK | 11 | 12 | OE- 😄💥💧 |
| 😄 [1] G1 | 13 | 14 | - |
| 😄💥💧 A | 15 | 16 | B 😄💥💧 |
| - | 17 | 18 | C 😄💥💧 |
| 😄 [1] B2 | 19 | 20 | - |
| 😄 [1] G2 | 21 | 22 | D 😄💥💧 |
| 😄 [1] R1 | 23 | 24 | [1] R2 😄 |
| - | 25 | 26 | [1] B1 😄 |
| - | 27 | 28 | - |
| 💥 [2] G1 | 29 | 30 | - |
| 💥 [2] B1 | 31 | 32 | [2] R1 💥 |
| 💥 [2] G2 | 33 | 34 | - |
| 💥 [2] R2 | 35 | 36 | [3] G2 💧 |
| 💧[3] R2 | 37 | 38 | [2] B2 💥 |
| - | 39 | 40 | [3] B2 💧 |
软件下载运行
- 下载github上的开源工程到树莓派上
git clone https://github.com/hzeller/rpi-rgb-led-matrix/
- 下载完成后,可以
在examples-api-use/目录中找到:
make -C examples-api-use
- 下载和编译过程参考下图:
示例运行效果
demo
1、执行下图指令,运行demo:
cd examples-api-use
sudo ./demo -D0 --led-no-hardware-pulse --led-cols=64 --led-rows=32
2、效果如下图所示:
c-example
1、执行下图指令,运行demo:
sudo ./c-example -D0 --led-no-hardware-pulse --led-cols=64 --led-rows=32
2、效果如下图所示:
minimal-example
1、执行下图指令,运行demo:
sudo ./minimal-example -D0 --led-no-hardware-pulse --led-cols=64 --led-rows=32
2、效果如下图所示:
text-example
1、执行下图指令,运行demo:
sudo ./text-example -f ../fonts/8x13.bdf --led-no-hardware-pulse --led-cols=64 --led-rows=64
2、运行demo后,依次输入想要显示的字符,回车,则会对应输出到显示屏上:
pi@raspberrypi:~/rpi-rgb-led-matrix/examples-api-use $ sudo ./text-example -f ../fonts/8x13.bdf --led-no-hardware-pulse --led-cols=64 --led-rows=64
Suggestion: to slightly improve display update, add
	isolcpus=3
at the end of /boot/cmdline.txt and reboot (see README.md)
Enter lines. Full screen or empty line clears screen.
Supports UTF-8. CTRL-D for exit.
Hello
Wvshare
Welcome
pixel-mover
1、执行下图指令,运行demo:
sudo ./pixel-mover --led-no-hardware-pulse --led-cols=64 --led-rows=32
2、效果如下图所示:你可以通过键盘的W,A,S,D移动显示屏上的光点
clock
1、执行下图指令,运行demo:
sudo ./clock -f ../fonts/7x13.bdf --led-cols=64 --led-rows=32 -d "%A" -d "%H:%M:%S" --led-no-hardware-pulse
2、效果如下图所示:


